
Digital Marketing
·
April 10, 2026
How SaaS Companies Handle Billing Disputes & Chargebacks
Learn how SaaS billing disputes happen, what triggers chargebacks, and how both sides can resolve them faster.
Automate HubSpot contact fields with workflows and sync properties. Use triggers like job title or lead status, test carefully, and maintain clean data.

Manually updating contact fields in HubSpot wastes time and increases the risk of errors. Automating these updates ensures your CRM stays accurate and helps your sales team focus on closing deals. For example, workflows can automatically adjust lifecycle stages, assign tasks, and send notifications when key contact properties like "Job Title" or "Lead Status" change. This not only saves time but also improves lead response rates and reduces missed opportunities.
Here’s what you’ll learn:

HubSpot properties are fields used to store specific information within CRM records like contacts, companies, deals, and tickets [7]. Think of them as labeled containers for data such as email addresses, job titles, or deal amounts. These fields are the backbone of your CRM, helping your team organize, filter, and segment records based on factors like location, industry, or engagement level [7][6].
There are two main types of properties: default properties (pre-built fields like "Email" or "Create Date") and custom properties (fields you create for your unique business needs, such as "Subscription Level" or "Product Interest") [7]. Each property is tied to a specific object type, meaning a property created for contacts won’t show up on deals unless you configure it through property sync [3][8].
HubSpot also provides specialized property types that enhance automation. For example, sync properties automatically duplicate data from one record to another, like showing a contact’s phone number on an associated deal [3]. Smart properties, powered by Breeze AI, can populate fields using web research or call transcripts [9]. Additional options include calculation properties, which compute values based on other fields, and score properties, such as "Likelihood to close", which predicts the chances of a contact converting within 90 days [6][8].
Before creating custom properties, review the default ones - there might already be a field that fits your needs [7]. If you do create custom properties, use the Rules tab in the property editor to enforce validation, like requiring unique values or restricting special characters, to keep your data clean [7][8]. Keep in mind that each property has an "Internal name" used for API calls and integrations, which cannot be changed after creation [8].
Mastering these properties is essential for leveraging contact fields effectively in B2B sales.
Contact fields play a pivotal role in streamlining your sales process. They capture historical data from multiple touchpoints, such as emails, calls, forms, site visits, and LinkedIn interactions [10]. Default properties like "Lead Status" and "Lifecycle Stage" provide a clear picture of where each lead is in the sales funnel, allowing for more precise pipeline management [10]. Custom properties, meanwhile, can track specific details like account tiers, technical needs, or job roles [10][13].
These fields enable dynamic segmentation by automatically updating lists based on criteria, ensuring your outreach stays targeted [10]. Unified contact data across your CRM eliminates "admin drag" - the time wasted on manual data entry across platforms [12]. On average, sales reps spend 6 hours per week manually entering data, and poor data quality costs companies around $15 million annually in lost opportunities [14].
Take GrowLink, an agricultural technology company, as an example. In 2026, they worked with Directive Consulting to segment their HubSpot database using behavior-based property filters. By tailoring workflows to dormant leads and new prospects, they reactivated cold leads, resulting in 32 new opportunities and 23 closed customers without increasing their marketing spend [13]. Similarly, SANDOW Design Group unified its contact management across four B2B brands using HubSpot, achieving a 30% boost in B2B email subscribers and cutting campaign build time by 97% [11].
"Before [my] unified CRM, I'd lose hours chasing prospect information. Now everything auto-compiles, and accurate prospect research is just one click away." - Dipesh Kothari, Senior Director, Procol [12]
Contact fields also support automated lead routing and assignment based on criteria like territory, industry, or company size [14]. Teams using automated follow-up sequences report a 28% increase in MQL to SQL conversion rates [14]. To improve efficiency, establish clear naming conventions for custom properties - prefixes like "SALES_" or "OPS_" make them easier to find across teams [14]. Additionally, use dropdown menus instead of free-text fields for properties like "Industry" or "Country" to ensure consistent data and avoid duplicates [14].
A solid foundation of well-organized contact fields fuels the automated workflows discussed later, helping your CRM drive efficient, goal-oriented sales operations.
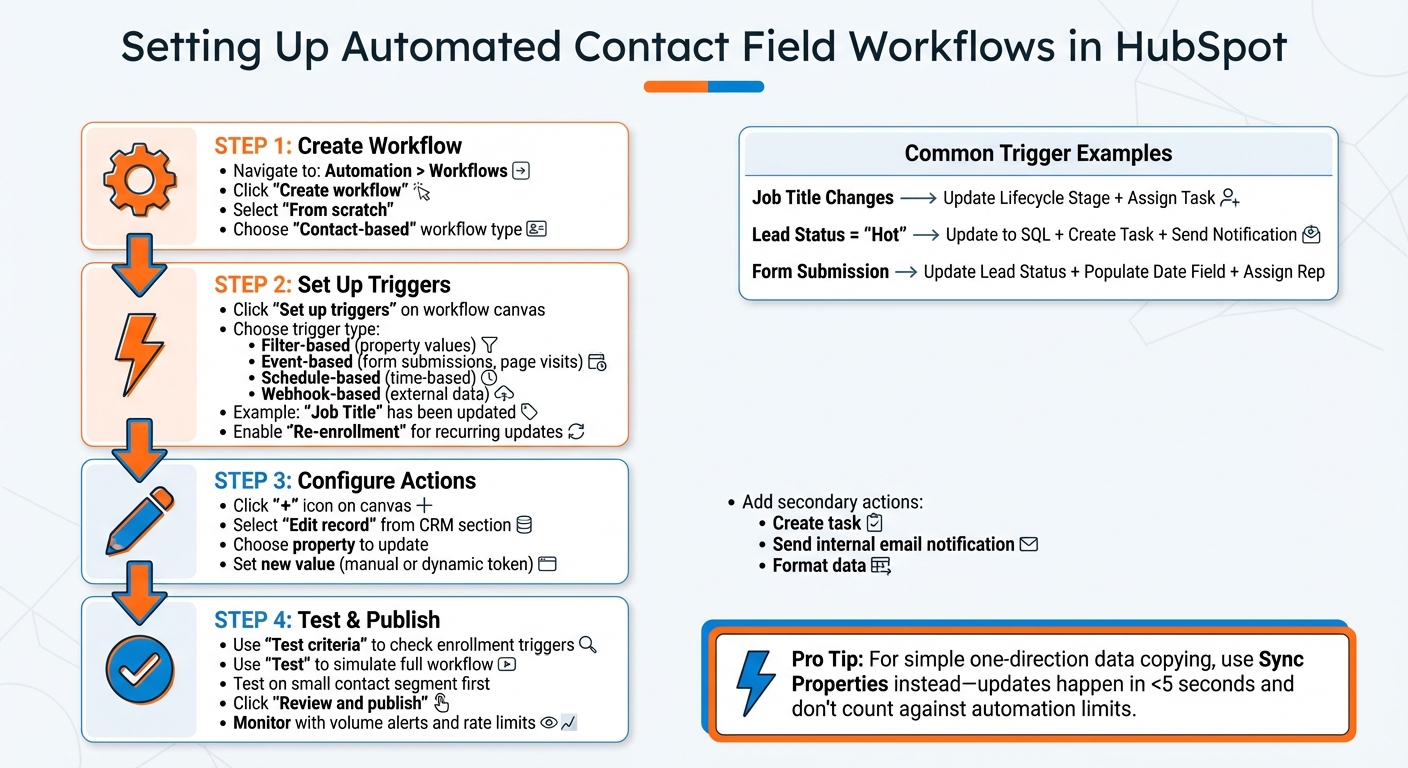
How to Set Up Automated Contact Field Workflows in HubSpot
To get started, head over to Automation > Workflows in your HubSpot account and click Create workflow. You’ll have three options: start from scratch, choose a template, or use Breeze Assistant (HubSpot’s AI). For this guide, select From scratch and pick the Contact-based workflow type. This ensures the automation is focused specifically on contact records, not deals, companies, or tickets.
Once your workflow is created, you’ll see the workflow canvas where you can build the automation logic. Start by clicking Set up triggers to define what will cause contacts to enter the workflow. Triggers dictate who gets enrolled and when. HubSpot offers several types of triggers:
For example, if you’re tracking job changes, select the "Job Title" property and set it to "has been updated." Similarly, for lead status automation, choose the "Lead Status" property with the same condition. Be sure to enable Re-enrollment so the workflow updates contacts each time their job title or lead status changes. Without this, a contact who changes jobs multiple times would only trigger the workflow once.
Once the workflow is ready, decide whether to enroll existing contacts who already meet your criteria or only include new ones moving forward. Keep in mind that HubSpot retains workflow action logs for 90 days and enrollment history for 6 months, with historical data stored for at least 2 years.
The next step is to fine-tune your triggers to align perfectly with your sales process.
Triggers are the backbone of responsive automation. One of the most impactful triggers for B2B sales teams is job title changes. When a contact’s "Job Title" property is updated - whether manually or through enrichment - you can automatically adjust their "Lifecycle Stage", assign a follow-up task to the account owner, or send an internal notification to alert your team. For instance, if a contact is promoted to a higher authority role, you can update their lifecycle stage to reflect their new level of influence.
Lead status changes are another common trigger. For example, set the trigger to "Lead Status is any of Hot" to enroll contacts who show high intent. From there, you can automatically update their "Lifecycle Stage" to "Sales Qualified Lead", create a task for immediate outreach, and send a Slack notification to the assigned rep. This type of automation can cut lead response times by up to 50% [5].
Event-based triggers, like engagement activities, work differently. Use actions such as form submissions, page visits, or email clicks as criteria. For instance, when a contact submits a demo request form, you can automatically update their "Lead Status" to "Hot", populate the "Demo Request Date" field with the current date, and assign them to the appropriate sales rep based on territory or company size.
Once your triggers are set, it’s time to configure the actions that will update contact properties.
After defining your trigger, click the + icon on the workflow canvas to add an action. Select Edit record from the CRM section - this is your go-to tool for updating contact fields. Choose the property you want to update and specify how it should change. For dropdown properties like "Lifecycle Stage", select a value from the list. For text fields, you can either type in a value manually or use the Insert data option to pull dynamic data from other properties or associated records.
Dynamic tokens are incredibly useful for automating updates. For example, you can populate a contact’s "Industry" field with data from their associated company record. If you’re working with multiple-checkbox properties, you can choose from options like "Append", "Replace", "Remove", or "Clear" to manage the data effectively.
Workflows can also include secondary actions. For example:
When all actions are configured, click Review and publish. It’s a good idea to test the workflow on a small segment of contacts before rolling it out fully. If you only need to copy a value from a contact to an associated deal in one direction, consider using a Sync Property instead of a full workflow. These updates are processed in less than five seconds and don’t count against your automation limits [3].
For automated workflows to function smoothly, the foundation - your data - needs to be clean and organized. A typical HubSpot portal might have anywhere from 300 to 500 custom properties, but only 30% to 40% of these are actively used. The remaining 60% to 70% often lack proper descriptions or documentation, leading to clutter and inefficiency [15].
As Peter Sterkenburg, HubSpot Solutions Architect and Founder of HubHorizon, puts it:
"Your HubSpot CRM is only as good as the data it contains." [15]
To address this, start by adopting standardized naming conventions. A structured format like [object]_[category]_[descriptor] in snake_case (e.g., contact_sales_lead_source) can help avoid duplicate fields and unnecessary sprawl. Before creating new properties, review HubSpot's library of 200+ default properties to ensure you're not reinventing the wheel [15].
Regular maintenance is key. Conduct quarterly audits to identify and remove properties that are either used in less than 5% of records or haven’t been updated in over 90 days [15]. Tools like the Data Quality Command Center can help by setting daily limits for duplicate records and alerting assigned users when thresholds are crossed. This tool also includes a "Fix and automate" feature to enforce consistent formatting for new entries [16].
In cases where data flows in one direction, Sync Properties ensures real-time updates for accuracy [3]. Additionally, document every automated field with a clear description, noting its data source (API, workflow, or manual input) and assigning an owner to maintain historical clarity [15].
Once your data is in order, you can confidently move on to testing your workflows.
No workflow should go live without proper testing. HubSpot provides two core testing tools: "Test criteria", which checks if specific records meet the enrollment triggers, and "Test", which simulates how a record moves through the entire workflow [17][18]. During testing, the record's path is highlighted in green, allowing you to preview results and timestamps without executing any actions.
Start small by testing workflows on a limited segment, such as cloned or internal test contacts, before rolling them out fully [5]. If something doesn’t work as intended, revisit the workflow’s timing settings - these might automatically reschedule actions [17]. Also, confirm that source and target fields are compatible when copying values [2][1].
Here’s an example: A financial services firm introduced contact-property triggers in late 2026 to automate lead routing based on industry and readiness scores. When a contact’s lifecycle stage or lead status changed, the workflow created tasks and notified advisors automatically. Within just one quarter, this reduced lead response time by 50% and minimized lost opportunities caused by misrouted contacts [5].
To avoid unintended mass updates, enable volume alerts and rate limits. You can also track changes using Property Change Events, which log timestamps and identify who made updates. Keep in mind, though, these events are capped at 25 per account with a monthly limit of 30 million occurrences [4].
With workflows tested and monitored, the next step is aligning them with your sales goals.
Once your data is reliable and workflows are tested, it’s time to align automation with your sales objectives. Automation should simplify the sales process, not complicate it. Start by agreeing on standardized definitions and assigning ownership for key fields like lifecycle stage, lead status, and ICP fit. Decide when property changes should trigger workflows versus when they just need a simple update or manual review.
Use lifecycle automation to keep contact stages up-to-date in real time, mirroring the buyer’s journey. Set up workflows to notify sales teams at critical milestones. For lead assignment, property-driven routing can streamline the process by using criteria like region, industry, account owner, or product interest. This ensures leads are assigned instantly, tasks are created, and contacts are enrolled in relevant sales sequences. Similarly, property updates can flag readiness, such as marking contacts as "sales-ready" or "onboarding-complete", to trigger timely notifications.
The Pedowitz Group emphasizes the importance of this approach:
"Treat property-triggered workflows as critical infrastructure: design them around your data model, document their purpose, and measure their impact on speed-to-lead, data quality, and revenue." [5]
To avoid duplicating efforts, consolidate repetitive actions into reusable "utility" workflows. For straightforward tasks like copying data between records, use one-way Sync Properties rather than building complex workflows. Also, configure re-enrollment triggers so contacts can re-enter workflows when their property values revert to a specific state. This ensures ongoing alignment with your sales goals.
For teams monitoring job changes, KeepSync offers a helpful integration. It automatically updates contact properties when a contact changes roles, enabling workflows to reassign ownership, update lifecycle stages, or create follow-up tasks. This keeps your CRM data current without requiring manual updates.
Automating HubSpot contact fields turns your CRM into a powerful tool that streamlines processes, eliminates tedious manual data entry, and minimizes errors. With accurate, real-time information at their fingertips, your team can focus on faster outreach and more productive sales interactions. For example, property-triggered workflows can significantly cut lead response times [5], while Property Sync ensures updates happen in under five seconds, keeping sales reps equipped with the latest data during their outreach efforts [3].
As Amanda ElMassih from HubSpot puts it:
"Workflows are a powerful tool that can dramatically influence your sales, marketing, and service teams. Manual data entry is tedious, but HubSpot's Workflows tool eliminates that burden." [19]
Start by automating a key property like lifecycle stage or lead status, and design a workflow around it. Test the process on a small group, evaluate the outcomes, and make adjustments as needed. Once you see the benefits, expand automation to other critical sales processes. Use these improvements to fine-tune your CRM automation and create stronger sales results.
Workflows are a great way to automate tasks triggered by certain conditions or data changes. Whether it's updating contact fields, changing lifecycle stages, or routing leads, workflows take care of repetitive actions for you. This not only saves time but also helps create more personalized customer experiences by ensuring the right actions happen at the right time.
Using a sync property allows you to copy data between related records effortlessly. This ensures that important information stays consistent and accurate across all associated records, cutting down on manual updates and reducing the risk of errors. It's a simple yet effective way to maintain data integrity and keep everything running smoothly.
To protect important data in HubSpot from being overwritten by workflows, consider implementing a few strategies. One option is locking properties after making manual updates, which prevents workflows from altering them. Another method is setting conditions within workflows so they only update properties when those fields are empty or meet specific criteria. You can also design custom logic that detects manual changes, blocking automated updates and safeguarding your critical information.
To safely test a property-update workflow in HubSpot, take advantage of its built-in testing tools. Begin by creating a test contact or record with realistic, sample data. Then, use the test mode to run the workflow. This process allows you to verify that properties are updated as intended, all without impacting your live data. It's a smart way to reduce risks and ensure everything functions properly before rolling it out to all records.