
Digital Marketing
·
April 10, 2026
How SaaS Companies Handle Billing Disputes & Chargebacks
Learn how SaaS billing disputes happen, what triggers chargebacks, and how both sides can resolve them faster.
Track former customers’ job changes in HubSpot, enrich records with KeepSync, and automate timely, personalized outreach to convert transitions into pipeline.

When former customers switch jobs, they can become high-potential leads for your business. Research shows they are 5x more likely to convert than cold leads, yet 89% don’t return to their previous vendors without proactive outreach. HubSpot’s job change tracking, combined with job change tracking tools like KeepSync, helps you monitor these changes and act quickly. This approach taps into the 70% of budgets allocated by new executives within their first 3 months on the job, potentially boosting your pipeline by 10% to 50%.
This guide walks you through setting up HubSpot for job change tracking, automating workflows, and crafting personalized outreach to turn career transitions into revenue opportunities.
Setting up HubSpot for tracking job changes effectively requires organizing your data, segmenting key contacts, and creating custom properties. The goal is to ensure your system captures career transitions while keeping your database actionable and clean.
Start by creating Active Lists in HubSpot to automatically update contact statuses. For example, filter for contacts where "Lifecycle Stage = Customer" and "LinkedIn Profile URL is known." This allows you to monitor former customers' career changes without manual updates [3].
For those high-value advocates - your champions or power users - set up a Static List. Unlike Active Lists, Static Lists don’t update automatically, making them ideal for monitoring specific individuals over a fixed period, like the next 12 months [6][8]. To keep your lists organized, use a consistent naming convention and store them in a dedicated folder [6].
To maintain an up-to-date contact pool, apply filters like "No longer in company" not equal to True and "Last scraped at" older than 25 days. This helps you avoid reprocessing outdated contacts [3].
Custom properties are essential for capturing and managing job transitions. Set up an "Employee Status" dropdown with options like "Current Employee" and "Former Employee" to flag departures [7]. Add text fields such as "Former Company", "Old Job Title", and "Start Date at New Company" to capture key details about career changes [5][7].
Include a checkbox property labeled "No Longer at Company" to trigger workflows, and create a "Champion Status" field to mark influential advocates who could promote your product in their new roles [7]. Don’t forget to add a "LinkedIn Profile URL" field - this is critical for automated tools to track career updates [4][5].
To keep your data consistent, use dropdown fields instead of free text wherever possible. Enable HubSpot's "Track Changes" feature for properties like "Job Title" and "Company Name." This will automatically log updates, trigger workflows, or create audit trails when changes occur [9].
| Property Name | Field Type | Purpose |
|---|---|---|
| Employee Status | Dropdown Select | Flags whether a contact is a current or former employee. |
| Former Company | Single-line Text | Records the name of the contact’s previous employer. |
| Champion Status | Checkbox/Dropdown | Identifies key advocates for potential outreach in their new roles. |
| New Hire Date | Date Picker | Schedules outreach within the first 90 days of a new position. |
| LinkedIn URL | URL | Enables automated job tracking and profile enrichment. |
A clean database is the foundation of effective tracking. When a contact changes jobs, avoid overwriting their existing record. Instead, create a new contact record for their new role and link it to their old record. As Petra, a Support Specialist at PhantomBuster, explains:
"This method follows HubSpot's recommended data hygiene practices: keeping your CRM clean while maintaining a full contact history. It avoids overwriting contact data, duplicating company records, or losing relationship context" [3].
Use association labels to preserve historical roles. For example, when a contact leaves a company, set up a workflow to update their association label to "Former Employee" for that company’s record [7].
Standardizing company names is another critical step. HubSpot’s matching is case-sensitive, so "hubspot" won’t match "HubSpot" [11]. Create an Active List to identify contacts with no property updates in nine months and target them for data validation surveys or automated enrichment [2]. Before diving into job change tracking, prioritize enriching records for contacts missing a "LinkedIn Profile URL" [3].
Once your data is structured and clean, you can integrate job change tracking with automated workflows in KeepSync seamlessly.
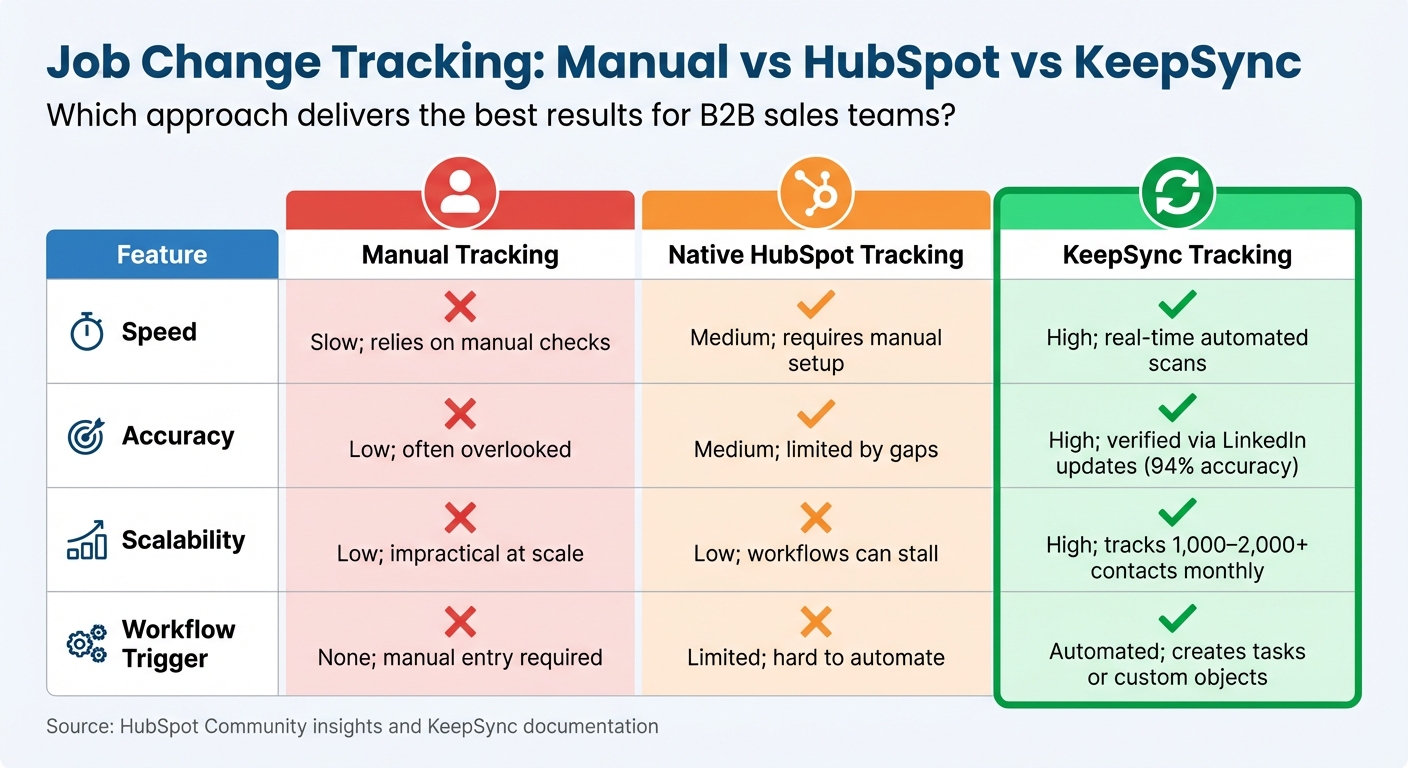
Manual vs HubSpot vs KeepSync Job Change Tracking Comparison
Once your HubSpot database is properly organized, automation takes over the heavy lifting. KeepSync continuously monitors your contacts' LinkedIn profiles, checking for changes in job titles or companies. When updates occur, KeepSync enriches the contact's record in HubSpot with fresh details like their new job title, professional email, and start date [4][3].
As Edyta7510 from the HubSpot Community points out: "Contact owners should be the key source of this info, but... this is very often not their key priority" [2]. Manually tracking these changes becomes nearly impossible when you're managing hundreds - or even thousands - of contacts.
The integration process is quick and straightforward. In about five minutes, you can connect KeepSync to HubSpot. Start by heading to KeepSync's HubSpot settings and selecting the LinkedIn URL property as your tracking anchor [12]. Use the "Prefill Default Settings" option to map key fields automatically, like Job Title and Company Name [12].
You can also customize how KeepSync updates your records. Choose whether to update existing contacts, modify company records, or create entirely new records when job changes are detected [12]. Field mapping options like "Replace" (to overwrite data) or "Complete only if it's empty" (to preserve manually entered details) give you control over how updates are handled [12]. These settings ensure your CRM stays accurate and useful for tracking meaningful job changes.
To fine-tune alerts, apply ICP (Ideal Customer Profile) and persona filters during setup. This way, your sales team gets notified about job changes that actually matter - like a former champion landing a director role at a key account - while ignoring less relevant shifts [12].
Once the integration is set, you can configure KeepSync to trigger tasks in HubSpot whenever key events occur, such as a contact changing jobs, switching titles, or adding a new LinkedIn URL [12]. Tailor these tasks to include enough detail so your reps can quickly identify high-priority actions. Assign these tasks to the "Contact Owner" to ensure the right person gets notified immediately [12].
For more advanced tracking, consider creating a custom "Intent" object in HubSpot. This allows you to categorize different signals - like job changes versus job postings - helping you analyze ROI over time [5]. You can even set up Slack notifications, email alerts, or trigger sales sequences directly from these events [5].
| Feature | Manual Tracking | Native HubSpot Tracking | KeepSync Tracking |
|---|---|---|---|
| Speed | Slow; relies on manual checks | Medium; requires manual setup | High; real-time automated scans [12] |
| Accuracy | Low; often overlooked | Medium; limited by gaps | High; verified via LinkedIn updates [5] |
| Scalability | Low; impractical at scale | Low; workflows can stall | High; tracks 1,000–2,000+ contacts monthly [3] |
| Workflow Trigger | None; manual entry required | Limited; hard to automate | Automated; creates tasks or custom objects [5] |
Kyle Jepson, a HubSpot Academy Evangelist, highlights a key limitation of HubSpot's native functionality:
"It seems there may not be a programmatic way to update Primary associations [natively in HubSpot]. That's... annoying" [13].
KeepSync solves this by automatically updating contact associations, removing the need for manual fixes. This automation streamlines your CRM processes, setting the stage for dynamic outreach workflows that can help turn former customers into fresh opportunities.
Using job change data effectively means turning insights into action. When KeepSync feeds job change updates into HubSpot, you can create workflows that automatically trigger tasks, notifications, and personalized outreach. This approach ensures you’re re-engaging former customers at the right time.
Once job change data is integrated into HubSpot, the next step is to set up workflows that transform these updates into actionable steps. Start by navigating to Automation > Workflows in HubSpot and creating a new contact-based workflow. Set the enrollment trigger to activate whenever a contact's "Job Title" or "Company Name" changes. This ensures the workflow runs each time KeepSync refreshes employment details.
To maximize opportunities, enable re-enrollment so that every job change triggers the workflow again.
For deeper insights, consider adding a custom "Intent" object in HubSpot. Use it to store details like "Old Company", "New Company", and "Tenure" [5]. This allows for better long-term reporting and helps identify which signals contribute most to revenue growth over time.
In your workflow, add a "Create task" action to notify the contact owner immediately. Use data tokens - such as the contact’s name, new company, and previous role - to provide context. Mark the task as High Priority so it stands out in the rep's daily task list. To streamline processing, you can also create a dedicated "Job Changes" task queue in HubSpot.
For teams using Slack, include a Send notification action to alert specific channels like #sales or #customer-success whenever a former advocate’s job change is detected. This ensures the entire team is aware of high-priority leads.
Stuart Balcombe, Founder of ConnectedGTM, underscores the importance of speed:
"New executives spend 70% of their budget in the first 3 months."
This urgency makes quick alerts crucial. Keep in mind that HubSpot may batch assignment notifications to avoid overwhelming users, but the delay is typically minimal.
Once tasks and notifications are in place, focus on crafting messages that resonate with the recipient’s new role and circumstances.
Your outreach should reflect the recipient’s history with your brand while recognizing their recent transition. Use personalization tokens like {{ contact.firstname }}, {{ contact.company }}, and {{ contact.previous_company }} to create tailored messages. For example:
"Congrats on the new role at {{ contact.company }}, {{ contact.firstname }}! I noticed you’ve moved on from {{ contact.previous_company }}. Once you’re settled, do you think it’d make sense to reconnect in a month or two to explore how {{ process/product }} fits into your plans?"
This type of message acknowledges their career move while giving them time to adjust to their new role.
Timing is key. Aim to engage within their first 100 days, as this is when new executives are evaluating tools and making strategic decisions. Research shows that 89% of past customers won’t return to a former vendor without proactive outreach. Pair job change signals with a multi-channel approach - such as LinkedIn messages and personalized email sequences - to ensure consistent and timely engagement.
Once your workflows are up and running, it’s essential to measure their impact. Clear metrics help you determine if tracking job changes is driving revenue or just creating extra work. By combining HubSpot's reporting tools with KeepSync's analytics, you get a complete picture of what’s working and where you can refine your outreach efforts. This integration bridges the gap between HubSpot's reporting capabilities and KeepSync's analytics, helping you fine-tune your strategy.
To track the journey from detecting a job change to closing a deal, set up custom reports in HubSpot. Go to Reports > Custom Report Builder and choose "Contacts" as your main data source. Add "Deals" and "Sales Activities" to see how job change outreach is affecting your pipeline [15].
Funnel reports can be incredibly helpful here. Use them to monitor key conversion stages like job change detection, meeting scheduling, deal creation, and closed-won deals. These reports highlight where contacts drop off and where your team excels [14]. If you’re an Enterprise user, you can take advantage of property change events to track updates to fields like "Company Name" or "Job Title." Keep in mind that HubSpot allows a maximum of 25 property change events per account and 30 million monthly occurrences [9].
For more targeted monitoring, create specific views. For example, set up a "Contacts no longer at company" view by applying a "No longer at company = True" filter. Similarly, create a "New contacts at new company" view to track fresh opportunities [3]. To enable before-and-after reporting, configure data hygiene properties like "Job started since" (Date), "Previous Company" (Text), and "Previous Title" (Text) [3].
Keep in mind that new data appears within 10–15 minutes, and reports refresh every two hours [15]. However, non-table reports are capped at 1,000 unique rows for performance reasons [15].
KeepSync adds an extra layer of insight by tracking top-of-funnel metrics that HubSpot doesn’t natively support. With KeepSync, you can monitor job change volumes, engagement rates, and calculate ROI based on closed-won revenue triggered by these alerts [5][10].
For better long-term reporting, consider using a custom "Intent" object in HubSpot to track job movements as unique records, instead of relying solely on tasks. This approach makes it easier to calculate your conversion rate from discussion to opportunity, which can be up to three times higher for job change signals compared to cold leads [5].
Another key metric to monitor is data accuracy and enrichment rate - the percentage of records updated with accurate business emails and LinkedIn URLs. This ensures your team is acting on reliable data [5][10]. With KeepSync’s 94% accuracy rate, you minimize time wasted on false positives and focus on actionable leads.
Different workflow approaches require varying levels of effort and deliver different returns. Here’s a breakdown:
| Approach | Effort Required | Financial Returns | Pros | Cons |
|---|---|---|---|---|
| Simple Alerts | High (Manual) | Low | Easy to set up; no complex automation needed. | High risk of lead slippage; inconsistent follow-up. |
| Basic Workflows | Medium | Medium | Automated task assignment; better tracking. | Still requires manual outreach; limited personalization. |
| Fully Automated | Low (after setup) | High | Scalable; consistent multi-step outreach. | Initial setup can be complex; relies on high-quality data. |
The fully automated approach stands out for delivering the best results once properly configured. By combining KeepSync’s precise job change tracking with HubSpot’s automation tools, you can build a scalable system that consistently engages former customers at just the right time - when they’re considering new tools and have the budget to act.
Tracking job changes gives B2B teams a golden opportunity to reconnect with former customers at the perfect moment - when they're exploring new solutions and making budget decisions. As Taimoor Tariq, Lead at Clay Club Berlin, explains:
"When a customer moves to a new company, they bring their positive experience with your product along with them. They're your best advocates."[1]
The numbers speak for themselves: past buyers are 5x more likely to convert into revenue compared to cold leads. Yet, surprisingly, 89% of these customers don’t return on their own after switching roles[5]. By leveraging job change signals, businesses can generate a 10% to 50% increase in pipeline[5]. This success is largely due to the fact that new executives typically allocate 70% of their budgets within the first three months of starting a new position[5].
While HubSpot’s CRM and workflow tools provide a solid starting point, they lack built-in automation for detecting job changes. That’s where KeepSync comes in. With 94% accuracy across 30+ data sources, KeepSync automates the process, identifying contacts who have moved and enriching their profiles with verified emails and company details. Best of all, setup takes just five minutes, giving your sales team the tools they need to seize new opportunities as they emerge.
HubSpot's job change tracking keeps you in the loop when a contact’s job title, company name, or email gets updated. Whether these updates happen manually or through an integration, HubSpot logs the changes and enables you to set up automated workflows. For instance, you can configure alerts to notify your team, refresh a contact list, or kick off a personalized outreach campaign to re-engage the contact in their new position.
To streamline this process, consider creating custom properties like Previous Company or Job Start Date to store historical data. Combining HubSpot with real-time data enrichment tools can also ensure job-related fields stay current automatically. This way, you can act quickly, turning job changes into a chance to reconnect and build fresh business opportunities.
Using KeepSync with HubSpot turns job changes into actionable insights for both sales and retention strategies. By automatically tracking public updates and syncing real-time job change data directly into HubSpot, KeepSync ensures your contact records stay current. This helps you avoid problems like bounced emails or missing chances to reconnect with past customers.
Beyond just updates, KeepSync adds valuable details to contact profiles, such as new roles, start dates, and previous employers. With this enriched data, HubSpot can activate automated workflows, alerts, and targeted lists, saving your team the hassle of manual research. The payoff? You can quickly spot warm leads, maintain key relationships, and transform former champions into advocates in their new roles.
To set up automated job change tracking in HubSpot, start by getting your contact data in order. Add custom properties like “Previous Company”, “Job Started Since”, or “Job Change Detected” to make it easier to track updates. Then, create a static list of contacts you want to monitor - this could include former clients or important prospects.
Next, head to Automation → Workflows and build a contact-based workflow. Use enrollment triggers to spot updates in fields like Job Title or Company Name, and configure them to activate when these fields are modified within a specific time period. To avoid duplicates, you can add a custom flag, such as “Job Change Detected”.
After that, set up actions for the workflow. These might include sending internal notifications to the contact owner, updating properties, or creating tasks for tailored follow-ups. Once everything is running, use HubSpot’s reporting tools to keep an eye on performance and fine-tune your process as needed.