
Digital Marketing
·
April 10, 2026
How SaaS Companies Handle Billing Disputes & Chargebacks
Learn how SaaS billing disputes happen, what triggers chargebacks, and how both sides can resolve them faster.
Automate HubSpot tasks like lead nurturing, pipeline updates, and job-change alerts to cut manual work and boost sales efficiency.

HubSpot workflow automation simplifies repetitive tasks like lead assignment, follow-ups, and pipeline updates, saving time and boosting efficiency for sales and marketing teams. By using "if/then" logic, it automates processes based on triggers like form submissions or property changes, enabling seamless CRM operations.
Key Highlights:
How it works:
From onboarding new leads to tracking job changes, HubSpot workflows streamline operations and deliver measurable results.
HUBSPOT SALES AUTOMATION
Automate Job Change Tracking in HubSpot
KeepSync monitors your contacts for job changes and updates HubSpot automatically. Free up to 1,000 contacts.
Request Early Access →
HubSpot workflows are automation tools designed to streamline tasks by triggering actions based on specific conditions. These workflows integrate seamlessly with your CRM, automating processes across various objects like contacts, deals, companies, tickets, and even custom objects. They also ensure that information flows smoothly between associated records [2]. The system operates on an "if/then" logic: when a condition is met - like a form submission or a property update - the workflow kicks off actions such as sending emails or creating tasks.
"Think of workflows as your digital operations assistant, working behind the scenes 24/7."
- Vikram Singh, The Webplant [9]
You can create workflows manually, use HubSpot's AI-powered Breeze Assistant to generate them from natural language prompts, or start with one of the many pre-built templates [5]. HubSpot also keeps workflow action logs for 90 days, enrollment history for six months, and historical enrollment data for over two years, giving you plenty of data to analyze and improve your automations [5]. Now, let’s take a closer look at the different types of workflows HubSpot offers.
HubSpot provides six main types of workflows, each tailored to automate specific CRM processes. For instance:
| Workflow Object Type | Primary Use Case Example |
|---|---|
| Contact-based | Lead nurturing, welcome series, and lifecycle stage updates |
| Company-based | Managing ABM target accounts and updating properties across associated contacts |
| Deal-based | Automating sales pipeline stages and notifying reps of deal progress |
| Ticket-based | Routing support inquiries and managing service-level agreements |
| Quote-based | Notifying sales managers when a quote is paid or requires approval |
| Custom Object | Automating processes for unique business data like subscriptions or enrollments |
Understanding these workflow types is just the start. To truly maximize their potential, you need to get familiar with their building blocks.
Every HubSpot workflow is built around three core components: enrollment triggers, actions, and settings.
Mastering these elements is key to building workflows that make your sales and marketing processes more efficient and effective.
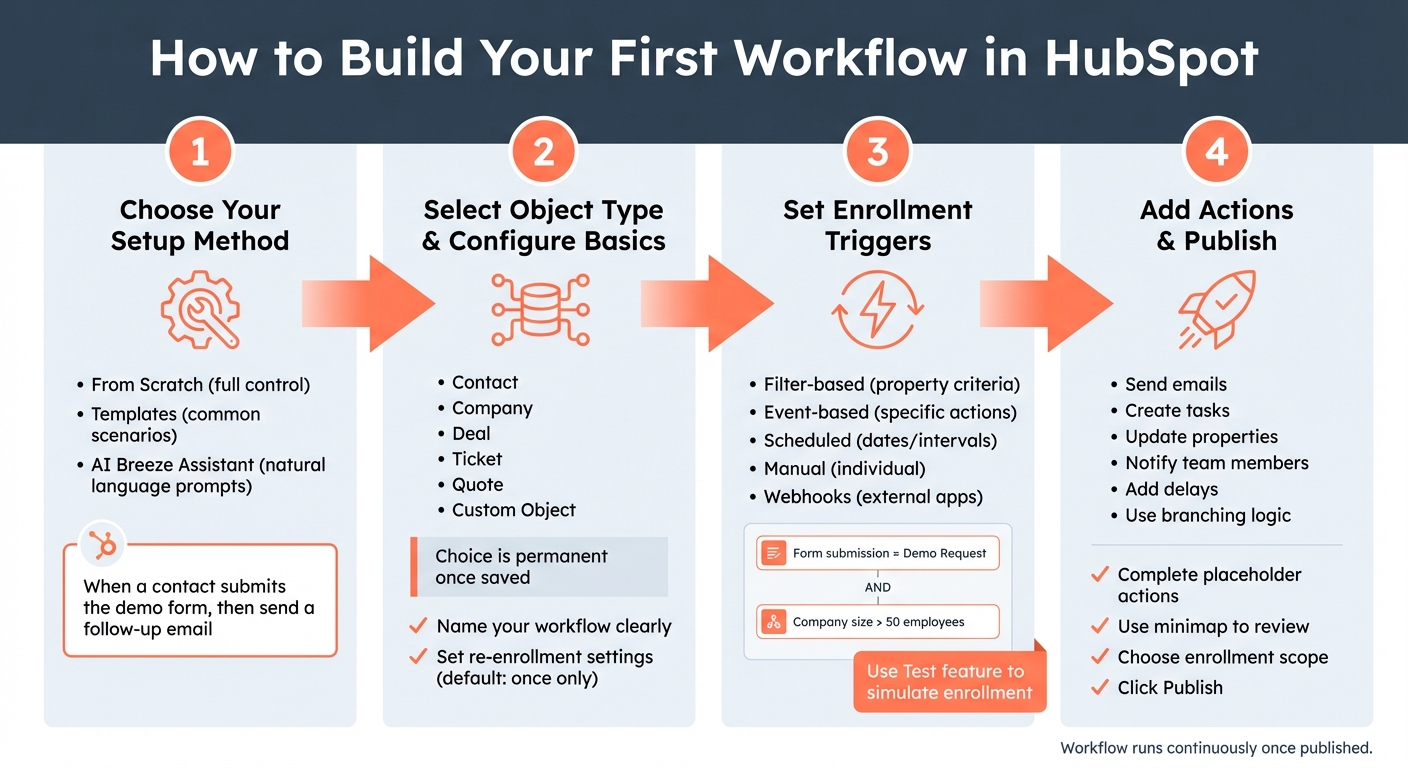
How to Build a HubSpot Workflow in 4 Steps
To get started, head to Automation > Workflows in your HubSpot account and click Create workflow [10]. From there, you’ll have three options: build From scratch for full control, use Templates for common scenarios like welcome emails or lead scoring, or let AI (Breeze Assistant) create the workflow by entering a prompt like, “When a contact submits the demo form, then send a follow-up email” [5][7].
If you’re building from scratch, the first step is to select your object type - this could be Contact, Company, Deal, Ticket, Quote, or even a Custom Object. Keep in mind that this choice is permanent; once you save the workflow, you can’t change the object type [10][11]. For example, if your goal is to nurture leads, go with a Contact-based workflow. If you’re streamlining sales processes, a Deal-based workflow is the better fit. Pick the object that aligns with your automation goal.
Next, configure the basics. Give your workflow a clear, descriptive name, such as "Demo Request Follow-Up", so it’s easy to identify later. You’ll also need to decide on re-enrollment settings. By default, records can only enter the workflow once. However, if you want contacts to re-enter every time they perform a specific action - like submitting a form multiple times - you can enable this option [5].
Enrollment triggers decide when records are added to your workflow. HubSpot provides five main methods: filter-based (criteria related to record properties), event-based (triggered by specific actions), scheduled (set for particular dates or intervals), manual (added individually), and webhooks from external apps [14]. For example, use an event-based trigger for real-time actions or a filter-based trigger for static criteria.
You can also combine triggers with "AND" logic to make enrollment more precise. For instance, you might set an event trigger like "Form submission = Demo Request" and refine it further with a filter such as "Company size > 50 employees" to ensure only qualified leads are enrolled. Before publishing, use the Test feature to simulate the enrollment process for a specific record to confirm everything works as expected [12].
Once your triggers are in place, you’re ready to add actions and finalize the workflow.
To define the actions in your workflow, click the + icon. From there, you can add steps like sending emails, creating tasks, updating properties, or notifying team members [5][13]. You can also include delays - like waiting three days before sending a follow-up email - or use branching logic to create different paths based on how recipients interact. For example, if a contact opens your email, you could send them a case study; if they don’t, you might send a reminder instead [15].
Make sure to complete any placeholder actions before activating your workflow [5]. The Show minimap panel in the upper left corner can help you quickly identify areas that need attention in more complex workflows [5]. Once everything is set up, decide whether to enroll existing records, new ones, or both [5]. Finally, click Publish, and your workflow will start running continuously.
Let’s dive into some practical workflows that can help B2B sales teams streamline their processes and improve efficiency.
Lead nurturing works best when it’s tailored to specific behaviors or audience segments. A great starting point is a New Lead Welcome workflow. This ensures that the promised resource is delivered right after form submission, followed by a series of educational emails over the next one to two weeks [17][18]. For high-intent actions - like visiting your pricing page - use "Go to Action" logic to immediately send bottom-of-funnel content [17].
Personalization is key here. Companies that excel in lead nurturing see 50% more sales-ready leads while cutting costs by 33%. Plus, personalized campaigns often generate 20% more sales opportunities compared to generic approaches [16][18]. However, only 15% of marketers feel confident in their current strategies [16].
To improve outcomes, consider these tips:
Now, let’s look at how automating your sales pipeline can keep deals moving smoothly.
Pipeline automation takes the manual effort out of deal progression. For instance, you can create workflows that automatically move deals through stages when a prospect replies to an email, books a meeting, or when a meeting outcome is marked as "Completed" [1]. Tasks can be auto-assigned to sales reps, or alerts sent via Slack to prompt immediate follow-up [6][19].
To prevent deals from stalling, monitor those inactive for 30 days and trigger actions like a manager alert, reassignment, or re-engagement email [6]. For example, Andrew Romanyuk, Co-Founder of Pynest, used AI agents in December 2026 to analyze company behavior, cutting lead screening time by 32% and allowing his team to focus on high-potential prospects [4].
Post-sale workflows are equally important. When a deal is marked "Closed Won", automation can assign a Customer Success Manager, send welcome emails, and create onboarding tasks [6]. Lattice’s sales team even used Dock's AI integration with HubSpot to auto-generate business case drafts from call recordings, leading to a 25% year-over-year increase in late-stage win rates [4].
With sales reps spending only 33% of their time actively selling [4], pipeline automation significantly reduces admin tasks. Just make sure to audit active deals weekly and review workflow performance quarterly to catch any errors or broken integrations [6][20].
And there’s more - automation can also help you capitalize on job change events.

Tracking job changes opens up opportunities to reconnect with contacts at their new companies or prevent potential churn. KeepSync enhances HubSpot’s automation by monitoring contacts for job changes with 94% accuracy, using weekly updates from over 30 data sources [21]. When a job change is detected, workflows can trigger Slack alerts, assign tasks, and enroll contacts in follow-up email sequences [21].
The results can be impressive. For instance:
A tiered workflow system works well here:
"The ROI was immediate. Within 45 days we had closed two deals from former customers who moved to bigger companies. Our SDRs love it because these are actual warm leads, not cold calls."
– Sarah Kim, Director of Sales, Velocity Commerce [21]
KeepSync integrates seamlessly with HubSpot in just five minutes. Pricing options include:
With an average ROI of 10–79X within a year, automated job change tracking is one of the most effective workflows you can implement [21].
Once you've implemented automation to boost sales efficiency, the next step is maintaining its effectiveness. This means consistently testing, monitoring, and organizing your workflows to ensure they continue delivering results over time.
Before launching a workflow, HubSpot provides two key testing tools to help you ensure everything runs smoothly. The Test criteria feature checks if specific records meet your enrollment triggers, while the Test feature simulates how a record will move through the workflow without triggering real actions [12][25]. This simulation includes timestamps for each step and highlights the record's path. For workflows with branching actions, it predicts outcomes based on the record's current state, but you can also manually explore alternate paths [12].
To avoid mishaps during testing, add a temporary condition like "Exit if email contains @yourcompany.com" to prevent accidental emails from reaching real customers [23]. Additionally, the Review Automation Issues dashboard helps you identify and address errors in your workflows. Issues are flagged with statuses such as "Fixed", "Ignored", or "Deferred" [22]. Common errors include attempting to move lifecycle stages backward (e.g., Lead to Subscriber) or sending marketing emails to contacts not designated as "Marketing contacts" [22].
"Testing isn't optional; it's the difference between an automation that runs and one that performs." – Manmeet Singh, Code and Peddle [23]
Once you've resolved any errors, it's time to focus on tracking the performance of your workflows.
For high-priority workflows, enable the Metrics setting to monitor conversion rates for each branch and action. This feature allows you to track up to 20 workflows per account and reveals the most frequently followed paths, as well as points where records drop off [26]. The Analyze tab provides a broader view, letting you compare workflows or specific automations over chosen timeframes to spot trends in enrollment and completion rates [29][30]. You can even filter performance data by workflow version to evaluate how changes - like updated email content or adjusted delays - impact results [26][28].
The Health tab is another valuable tool, flagging "Unused workflows" (those with no enrollments for over 90 days) and workflows needing review due to errors [24]. To dig deeper into outcomes, create contact lists based on workflow results such as "Met goal", "Completed", or "Lost." This helps you track how contacts progress through the sales funnel after automation ends [28].
As your automation library grows, keeping workflows organized becomes critical. Use folders to group workflows by their purpose, such as lead nurturing, contact assignments, or departmental tasks [31]. A clear naming convention can also save time - include details like the target persona, topic, and goal (e.g., "Marketing_MQL_Nurture_Whitepaper") [27]. Adding enrollment criteria, goals, and persona details in the description field helps new team members quickly understand the workflow's purpose [27].
Advanced filtering makes it easier to locate workflows based on object type, creator, assigned team, or specific actions like "Create record" [31]. You can also customize table columns to display relevant data and save filtered views for quick team access [31]. Regular audits are essential - export your workflow list to Excel to identify and remove inactive workflows with zero enrollments [27]. For complex automations, use the minimap to navigate workflows and identify actions (highlighted in yellow) that need attention before publishing [5][32]. If a workflow is deleted, it can be restored for up to 90 days, and changes made in the last 30 days can be undone or redone [31][32].
Once you've fine-tuned and monitored your workflows, it's time to make the most of the efficiency gains. HubSpot workflow automation reshapes how B2B sales teams function by cutting out the manual tasks that take up 67% of a sales rep's day [4]. The key difference between companies that struggle with their CRM and those that scale successfully boils down to one thing: smart automation [3].
Start by tackling your biggest bottleneck - whether it's lead assignment, follow-up emails, or pipeline management. For example, in 2026, Edward Arnold at Flowla automated post-demo follow-ups using AI-generated recap emails. This change saved 30 minutes of manual prep time per call and boosted demo-to-deal conversions by 12% [4]. It’s a clear example of how focusing on high-impact workflows can drive results.
The process is simple: set clear goals for your workflows, test them with real data, and use suppression logic to prevent over-communication. Organize your automations with folders and consistent naming conventions, and perform quarterly audits to remove outdated workflows that no longer align with your business needs [3][6]. Regularly updating your processes ensures they stay relevant as buyer behaviors shift.
Automation isn’t a one-and-done task. As Fawwad Mirza from Pixcell puts it:
"Automation is a journey, not a destination" [3].
Keep an eye on workflow metrics, monitor conversion rates, and make adjustments based on data insights. The workflows you create today should evolve alongside your business and your buyers’ needs.
Consider strategies like job change tracking to further optimize your sales outreach. Implement these techniques in your HubSpot setup now. The time saved from reducing administrative tasks can be reinvested into high-value selling activities - and that’s where growth happens.
The best type of workflow to use in HubSpot depends entirely on what you're trying to achieve. Here’s a quick breakdown to help you decide:
Pick the workflow that aligns with your specific process to streamline operations and hit your automation targets.
To keep your HubSpot workflows running smoothly and avoid issues like unwanted enrollments or duplicate emails, there are a few key steps you can take:
These practices can help you maintain better control over your workflows and ensure your communications stay on track.
Tracking the right metrics can reveal how well your workflows are performing. Focus on workflow conversion rates, lead routing efficiency, and engagement levels. These numbers can tell you if your processes are hitting the mark or need some tweaking.
Also, take a closer look at how workflows are improving specific tasks, such as lead follow-ups, internal notifications, and customer engagement. These areas are often the backbone of smoother operations.
Why does this matter? These metrics show the return on investment (ROI) by highlighting key benefits like time savings, higher lead conversion rates, and better customer experiences. Together, they paint a clear picture of how workflows contribute to sales growth, streamlined operations, and stronger marketing results.
📚 HubSpot Sales Automation Series